Wednesday, November 23, 2016

Don't Default to White

One of the most common and jarring color mistakes I see is the use of plain white paint on ceilings and on interior and exterior trim, apparently without determining whether or not it's a good choice. I'm guessing that these things get painted white by default in the mistaken belief that it's "safe" because it's usually what people do, and finding a wall color they liked was stressful enough. After all, plain white goes with everything, doesn't it? Or does it?

White Ceiling and Trim By Default
Don't get me wrong. I like white, even plain white, when it's used in the right way, with the right wall colors and in the right places. But unfortunately I usually see it used with high contrast and/or neutralized wall colors and with natural materials like granite, wood, stone and tile. It's a combination that's unflattering to all participants because when there's no common color present to tie everything together, what your eyes see is the way they're different, and that sets up the perception that something isn't quite right.

Keeping It Simple: Basic Things to Consider When Choosing a White

Hue Family of the Wall Color


Every color, unless it's pure white, pure black, or white with varying amounts of black added, can be traced to a hue parent (red, orange, yellow, green, blue, purple). The hue family of your wall color is where you should start to find the right white for the ceiling and/or trim.

Tint, Tone or Shade?


After you identify the hue parent, decide if the color is a tint (hue plus white), a tone (hue plus gray), or a shade (hue plus black).

Think of tints as pastels and tones and shades as neutralized colors. If your wall color is a tint, avoid the neutralized whites. If your wall color is a tone or a shade, avoid the tint whites. Fortunately, clear, bright tint colors are easy to spot when you're standing in front of the displays at the paint store, helping you to stay in the right area when you're looking for a white that will work.

For example, if you use a neutralized member of the yellow family (a tone or shade) on the walls, look for a neutralized white from the yellow family for the trim. If you have a tint yellow on the walls, use a white tinted with yellow for the trim. If your wall color is a neutral such as a taupe that looks like a green/brown combination, your off-white trim should have at least one of these components.

This isn't the only approach to choosing a white,  just a way to keep it simple.


How Much Contrast?


Deciding how much contrast you want between the ceiling, walls and trim should be based in part on how much attention you want to focus on them. With higher contrast colors you need to be sure that that the trim has merit and is attractive and well-proportioned.

A Collection of Boxes
For exteriors this is especially important because treating functional banding boards as trim and painting them in a high contrast color like plain white is very unflattering and undermines the crucial sense of unity and harmony. After all, you don't want your house to look like a collection of boxes... For interior trim, unless it's unusually large and lovely, consider painting the crown and baseboards in the wall color or in a low contrast accent color from the same family to make the room look larger. 


LRV (Light Reflectance Value)


If you've decided to have white trim, you can choose a white with exactly the right amount of contrast by looking up the Light Reflectance Value (LRV) for your wall color and then for the whites you're considering. 

Paint manufacturers determine the LRV for each color they make by measuring it with a device and numbering the result on a scale of 0 to 100, with 0 being the blackest black and 100 being the most reflective white. An LRV of 50 is the happy medium and the standard for residential interior wall colors. To see contrast between two colors you usually need a difference of at least 7 points. In addition to finding LRV numbers on line at each manufacturer's web site, you can find the values for Sherwin Williams colors on the back of the paint strip and the values for Benjamin Moore colors at the back of the fan deck in numerical and alphabetical order. Comparing LRV values eliminates the need to guess about contrast and is easy to do.

To Sum It Up:


Use plain white for your ceilings and trim only if you love it and after you've done the homework to be sure it works with your wall color. While you're at it, consider branching out by using a color other than plain white. There's a universe of beautiful colors to choose from, and one or more of them is probably a much better choice.




Thursday, April 7, 2016

How to Choose a Paint Color for Exterior Stairs

Before - Stair Risers Accented in the Trim Color
It's fairly common to see front stairs and risers painted different colors, but it doesn't necessarily mean it's the best approach. I believe that the only details that should be painted an accent color are the ones that deserve the attention, and stair risers usually don't qualify for the spotlight. 

In the "Before" picture the stair risers were painted in the trim color and the deck and stair treads were painted a green that clashed with the yellow walls and the cement walkway. Between the excessive accenting and the color clashes, far too much was going on. 

The house was about to go on the market and it was essential that the picture of the exterior for the MLS listing have maximum appeal. In a perfect world I would have recommended a color change for the walls, front door and storm door, but that wasn't in the budget. 


After - Treads, Risers and Deck Painted One Color
The deck and stairs were in poor condition and had to be painted. That created the opportunity to make the house a little bit more photogenic by correcting the color disharmony and reducing the number of accented details.  

I recommended using a single color on the deck, treads and risers, one that was chosen to coordinate with the house and cement walkway.  In the "After"  picture you see the benefits of treating the stairs and deck as a single unit. 


Some Color Considerations for Exterior Stairs


Here are some color considerations for exterior stairs, particularly front stairs:
  • What are the colors in the permanent details of the house and landscaping, such as in roof, walkways, stone foundation, key flowering plants, etc.? You have to consider all these colors when choosing the stair color.
  • What paint colors are used on the house and trim (wall color, front door color, trim color(s), etc.)? Do they work well with the permanent details? The stair color should coordinate with everything. You might be able to use the stair color to create more color harmony between the house colors and the colors of the permanent details, if needed. 
  • Consider the architecture of the house. Are there already lots of accents, or does the house need more? If more pizzazz is needed, are accented stairs the best way to provide it?
I think restraint is usually the best approach to accenting, so my preference in most cases is to use a single color for stair treads and risers. As the "Before" and "After" pictures demonstrate, using one color creates better flow because your eye takes in the stairs as a single unit, as opposed to seeing the stair components. 

What you might have thought to be a simple matter, painting the stairs, is in fact something that has a big effect and deserves thought.

When it comes to color selection, whether it's for stairs, the whole exterior, or for the inside of your house, success comes down to choosing the right colors and using them in the right places. Color selection is the phase that receives the most emphasis, but I believe that where you put the colors is equally important. Color placement done correctly is a powerful tool that can correct many design shortcomings, showcase the best, hide the rest and help your house live up to its potential.

If you have a painting project coming up and would like help with choosing and placing colors, call me at 828-692-4355 to schedule a color and design consultation. If we do the painting for you, this help is a free part of our services. 


Monday, February 8, 2016

The Kitchen Ceiling Repair Project


We just completed a major repair project on the ceiling in our kitchen and family room. It wasn't much fun, but it had to be done. We were "lucky" that we were snowbound for a few days last month and able to focus on the work so that Roger could complete it in record time.  


Phase 1 - The New LED Lights


The gaps in some areas were 1/2 to 3/4 of an inch.


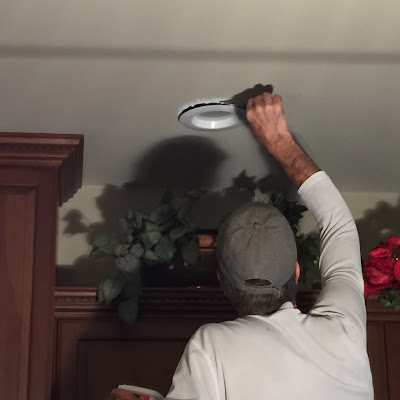
The project began when we ditched the old halogen lights in the kitchen in favor of LED lights. It was easy for Roger to make the switch and the new lights are a big improvement, but as you can see, they didn't fit the holes exactly so he had to make cosmetic repairs. 

Roger puts up a debris containment tunnel.


The first step was to sand the ceiling around the perimeter of each light. Falling debris and some escaping dust particles are inevitable, but Roger created a series of "containment tunnels" to minimize the clean up. 
Filling the voids in the ceiling.


Next Roger filled the voids between the light and the ceiling with   3-M Patch Plus Primer. After it dried he added more where it was needed, sanded again and caulked the perimeter of the light to create a smooth transition to the ceiling. 


As you can see, this is fussy work. There were eight lights to fix and some were quite challenging because of large gaps between the light and the ceiling.
Note that the rim of the light has gotten a first coat
of the ceiling color so it will blend in.

After Roger fixed the lights, he moved on to the next phase - cracks in the ceiling that were really bugging us.

Phase 2 - Repairing Some Cracks and Bad Taping 


After the first of the two long cracks was repaired.
We have an open plan and the kitchen ceiling continues to the family room. Two long cracks had appeared between the two areas from faulty sheet rock installation and bad taping, along with a couple of smaller ones. We could see the cracks coming and going, making invisible repairs very important to our peace of mind.

Fortunately Roger is an expert at solving difficult cosmetic problems, but I have to admit that fixing the cracks was an even bigger and messier job than Phase 1. It meant a major disruption to our lives for a few days, but it was part of the process so I just accepted the chaos.


Phase 3 - Painting


Because of the extensive repairs, touching up the paint was impossible and the entire ceiling had to be repainted. That meant the kitchen and family room had to be cleared so that everything could be covered with plastic. Then Baci and the other cats had to inspect the preparations to make sure Roger had done them properly. 


Late that night the kitchen was covered 
and ready for painting.

While Roger prepared the paint, Baci inspected 
the family room.

Once the lights over the island were wrapped in plastic, the only light source for this picture was a work light, but you can get an idea of how much covering up had to be done.


The Happy Ending

It took a full day to paint the ceiling, but when all the work was done and the drops and plastic were removed, it looked great. Everything is back to normal now and you can't tell that Roger worked miracles fixing the cracks and the areas around the lights. 

There were two long cracks here.


All eight new lights had to be worked on.


Compare this with the "before" picture above.


Baci smiles in approval while she calmly waits 
for the plastic and drops to be removed.


If you have a project with cosmetic repairs that will require an expert touch, call me at 828-692-4355 and schedule an estimate. Chances are, Roger can work miracles for you too.