Tuesday, November 5, 2019

Exterior Painting in Hendersonville, NC: Flattering the Brick

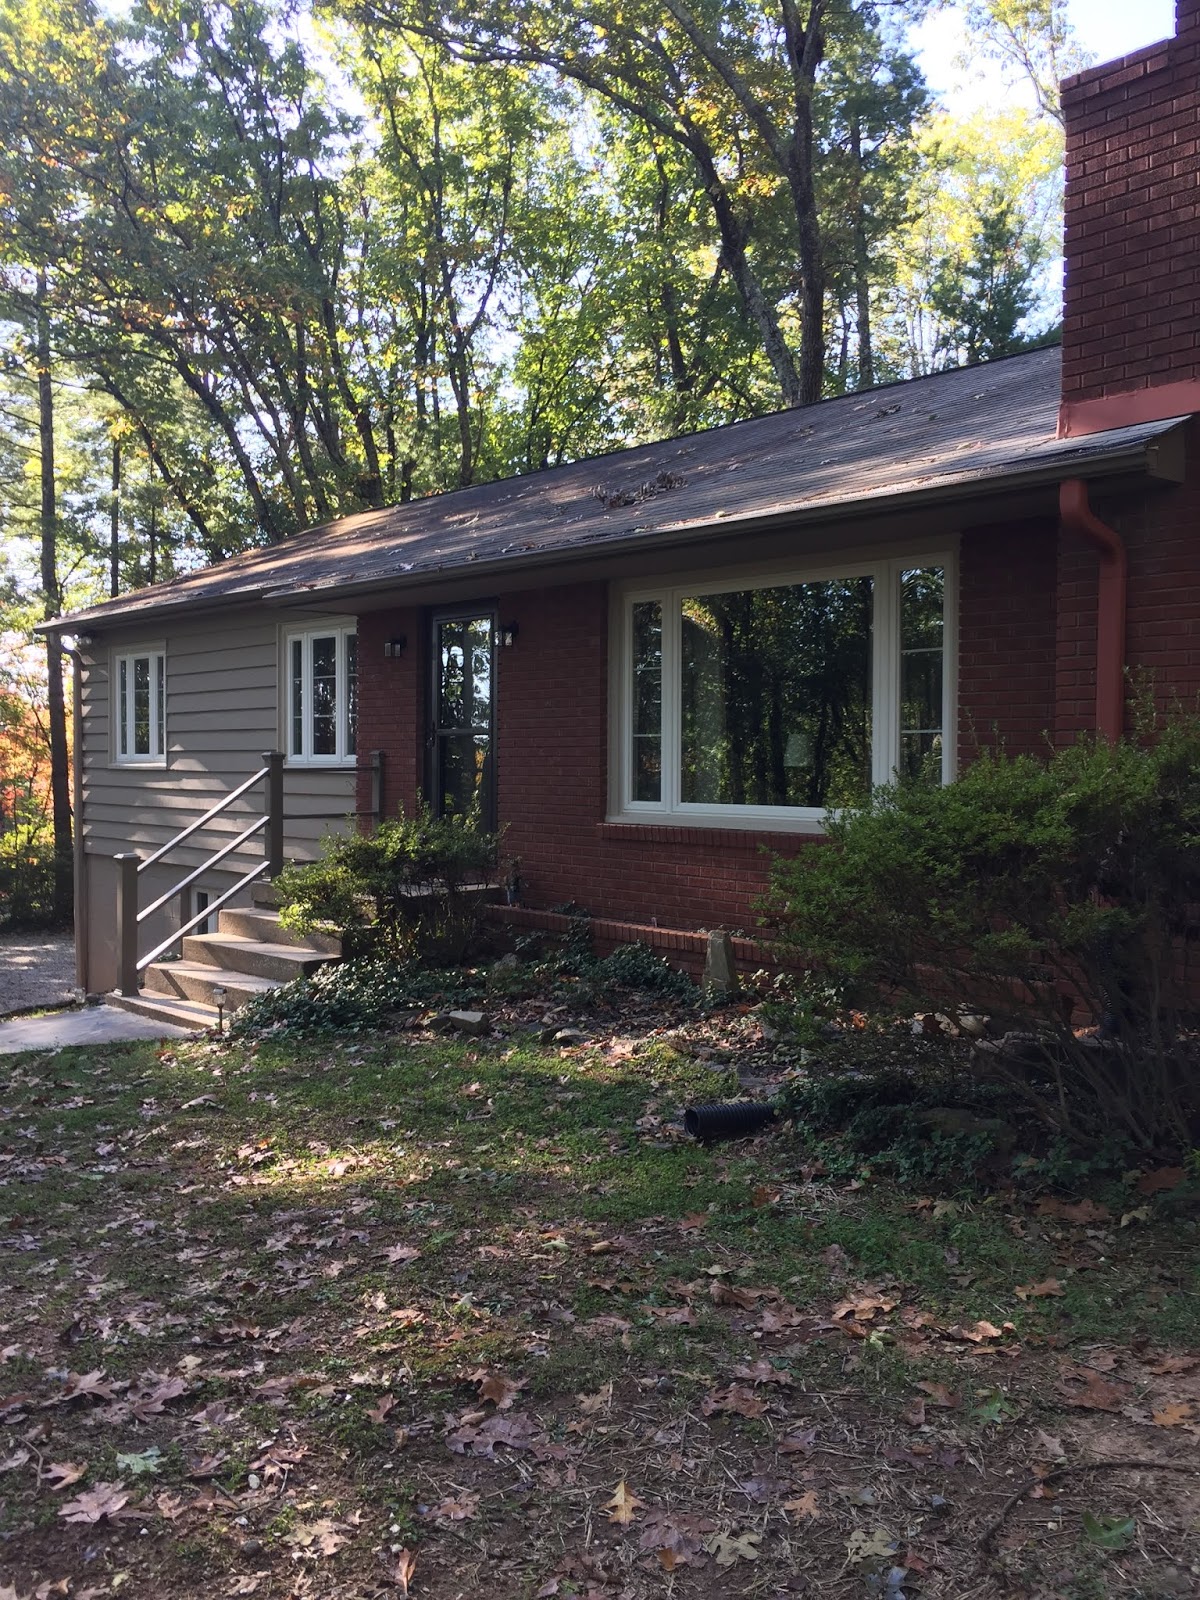
The front of the house after
The brick we typically see has shades of red, orange, yellow, or brown, but this house was different. Its brick had shades of dark purple, dusky lavender, and mauve. It was a star player in the front of the house because it was a prominent feature on both sides, and it also was used for a large retaining wall.

The existing blue paint on the siding and trim not only didn’t enhance the brick, the colors worked against it. 

 It was time to give the house a fresh, updated look, and coordinating the new paint colors with the brick became one of my top priorities.


The House Before


The New Color Plan


To develop the new plan I used my spectrophotometer to identify the hue families of the major colors in the brick so I could analyze them and be confident the new paint colors for the siding and trim would work. I also considered the roof colors, which fortunately were very similar to the colors in the brick.

In addition to new colors, I took a different approach to accenting:
  • The garage doors weren't accented this time. Instead, they were painted in the body color to make them less prominent and less of a distraction as visitors approach the front door. 
  • To add more curb appeal, the shutters were painted a special accent color, matched to the beautiful eggplant color in the brick. 
  • The new front door color was different from the trim and shutter colors. It was inspired by the red Japanese nearby, making it a dramatic and elegant focal point. 
  • The unpainted lattice below the sunroom wasn't accented. It was painted in the wall color to make that side of the house look more unified and simple. 

Paint Schedule


Although most of the colors are from Sherwin Williams, the paint we used is from the premium grade Aura line by Benjamin Moore.

Walls, Lattice and Porch Skirting Board:              Dorian Gray SW 7017 
Aura Exterior Matte

Fascia, Eaves, Window and Door Casings:           Mindful Gray SW 7016
Aura Exterior Low Sheen

Porch and Sunroom Ceilings:                                  Repose Gray SW 7015
Aura Exterior Matte

Porch Floor and Stairs:                                              Gauntlet Gray SW7019
Arborcoat

Front Door:                                                                  Townsend Harbor Brown HC-64
Aura Exterior Satin                                                     Benjamin Moore 

Shutters:                                                                       Darkroom SW 7083
Aura Exterior Satin

The House After


Here's what the homeowners said when Roger was done:


"*****
We had a great experience with both Roger and Sandy of Sterling Property Services. With new exterior paint, our home looks fresh and has a more modern and pleasing aesthetic than it ever has. We had some challenges to work around-coordinated brick and siding colors as well as protecting the original materials-so we wanted to make sure to use an expert. Now our house is much brighter and more streamlined. Roger's attention to detail and expertise were just amazing. It is so gratifying to see a true craftsman at work. We feel good that our siding is in great shape for years to come, and it looks beautiful!!"


If you'd like to update the interior or exterior of your house with a fresh approach to color, I'd love to help you too. Call me at 828-692-4355 and we'll make an appointment for a consultation. If you decide you'd like to have us do the painting, my services are free of charge. Otherwise, I charge $250 for a two-hour consultation and large color samples (travel charges may apply in some areas) to help you make your final choices. If you'd like my help but don't live in my service area, I also offer on-line color consultations. 


Tuesday, October 1, 2019

Prevent Ladder Damage to Your House

Roger sees ladder damage all the time: black scrape marks on siding caused by leaning or dragging a ladder, dirt or other contaminants transferred to the siding by a ladder, or even worse, chipped paint on gutters, or even dented gutters. The culprit might be window washers, gutter installers or cleaners, amateur painters or pressure-washers, or it might even be you.


Repairing the Damage


Pressure-washing doesn’t help, nor does a cleaner like Jomax. Sometimes a magic eraser can reduce the scrape marks, but usually repainting is needed. And if metal gutters are damaged, they may have to be sanded and spot primed before repainting. Don't ignore seemingly minor damage to metal gutters because chipped paint eventually will cause rust. 


Prevention is the best medicine


If you’re having work done, be sure to have a conversation when you're getting the estimate about the need to make sure all ladders are clean and wrapped and equipped with a stabilizer when appropriate. Be sure to be there during the work so you can double-check to be certain the ladders are properly prepared. If you're doing the work yourself, get a pair of ladder booties and keep them clean.

Friday, August 9, 2019

Every Detail Mattered: An Exterior Transformation in Tryon

This was a project Roger and I were eager to do. From the moment Roger first saw the house when he did the estimate, to my first look at the pictures he took that day, we both knew that our craftsmanship, color expertise, and attention to detail, along with using top quality materials, could make a significant difference. Not only could we add to the value of the home, we could also give our clients a place they could enjoy and be proud of.

Front of the House After

First Impressions

As you can see below, not only did the existing colors not flatter the house, the different elements of painted siding, brick, vinyl windows, and the raw foundation looked unrelated instead of as a unified whole. The front of the house also looked lop-sided because the right side was one story while the left side was two stories. The existing paint was in very bad condition and nearly everything required significant prep. While Roger began to tackle all of that, I met with the homeowners to discuss the new colors.

Here's how the house looked on the day of the estimate:

Front Side Before

Front Door and Storm Door Before
Red, White and Blue

Right Front Window Before
Note the Small Scale Trim


Downspout and Chimney Flashing Before
Distracting

Garage Side Before
The Lower Half Looks Unfinished


Patio Area Before
Vinyl and Paint Colors Don't Work
Patio Door Before

Back of the House Before
Unpainted Lattice

Color Considerations


The first thing I explained to the homeowners was that the colors of the fixed elements, including the yellow-red brick and the brown roof, had to guide us, as it was crucial that the new colors coordinate with them. There also was the new flagstone patio by the kitchen door to be considered and the stark white vinyl windows and storm doors. Then there were utilitarian items like the downspouts and other details that were in full view. My goal was to camouflage them when possible, or at least diminish their impact.

After we walked around and talked, we started looking at large color samples on every side of the house with their different lighting conditions. Eventually, the winning siding color was Benjamin Moore Alexandria Beige HC-77. We used premium quality Aura Exterior Paint throughout.


How Color Selection and Strategic Placement Addressed The Issues 


  • To make the house look unified and less lop-sided, I suggested that the new siding color be similar in value to the brick, and that the foundation be painted in the body color. Because the lot is shaded, a darker color would have looked gloomy, but Alexandria Beige worked well with the brick, roof, and patio.
  • The white downspout and the chimney flashing on the front side needed to disappear, so we matched the brick and painted them in Georgian Brick HC-50.
  • To add interest, the fascia was painted in Fairview Taupe HC-85.
  • The trim around the vinyl windows was very skimpy and plain. To make the trim look larger and reduce the contrast between the siding color and the vinyl, we used a lighter color than the siding, Stone Heath #984, and Roger painted not only the existing trim, but the fixed metal edge of the window. 
  • The front door and the storm door were painted in Aura matched to Sherwin Williams Sealskin SW7675.
  • The patio door and storm door were painted in Alexandria Beige.

The Results: 


Front side looking left
Front Door After


Front Window After

Downspout and Roof Flashing After

Garage Side Almost Finished


Back After
Patio Area After

Patio Door After

Our clients were thrilled by the way the house looked when we were done, and we were almost as happy as they were. 

If your house needs a makeover, call Sandy at (828) 692-4355 to schedule an estimate. We can achieve the same kind of results for you!

Monday, April 22, 2019

How to Find a True Paint Color Expert

There are a lot of self-proclaimed paint color experts these days, many of whom have little or no scientifically based color training. Some have even created their own approach and managed to market (and monetize) it with workshops, videos, color sample boards, blog posts and more. What most have in common is that the best they can offer you is their personal opinions about color, but unfortunately opinions aren't the same as true color knowledge.

So What's Wrong with Opinions? 


What's wrong with having only opinions to offer is that color is a personal experience because of our unique vision and brain. So when one of these "experts" on Pinterest or Houzz or in a blog gives an opinion about a color, all they're telling you is what the color looked like To Them in some unknown setting, with no objective data to support their claims. Since color is light waves that are defined by context and by the observer, their opinion doesn't help you. You have no idea whether or not they have good color acuity, or under what circumstances they formed their opinion. This reliance on unsubstantiated opinion in the absence of any scientific standard also explains the confusing and often conflicting claims you see about a color's "undertones".

I can tell right away that someone doesn't know color when I see the use of the term "undertone". There is no such thing because architectural paint is opaque. Straight out of the can it doesn't have undertones. Instead, every color except pure black, pure gray and pure white belongs to a hue family. True color experts know this and know how to scientifically identify these hue families and use Hue along with other objective information, including Value, Chroma and Light Reflectance Value to specify color.

Sandy LeRoy, Camp Chroma
Certified Color Strategist II 

Bottom Line


When you want to work with someone who really knows their stuff, ask if they use objective, i.e. scientific and measurable color data values in their work. Better still, ask if they're a Certified Color Strategist through Lori Sawaya's excellent training in Camp Chroma at The Land of Color. They're truly knowledgeable people you can count on, and I'm proud to be one of them.


Thursday, March 28, 2019

Our Laundry Room Make-over

The "new" laundry room 
There was no question that our little laundry room was looking tired. It had worked hard ever since we moved here nearly fifteen years ago, serving as laundry central, cat central and as the place for flower arranging, etc. The original Formica counter top had gotten nasty and the white laminate shaker style cabinets didn't really suit the rest of the house which has cherry wood kitchen cabinets and cherry stained doors and trim throughout. The laundry cabinets were good quality and in great condition, but their color and style were just wrong. We weren't about to change them, but it was long past time for a makeover to make them feel less out of place.

I admit that sometimes I wish Roger could drop everything and work on our latest project because having the house torn up for long periods of time is no fun, but that's not the way it goes with us. Painting for our clients always takes precedence! And even though the laundry room is a small space, there was a lot of time-consuming work involved, so the transformation wasn't going to be a quick fix.


Roger had to paint the ceiling and walls, the interior of two double storage closets with wire shelving units and three banks of cabinets. There was a lot of packing up and dismantling to be done before he could even start painting. Everything seemed to move at a snail's pace to an impatient sort like me, but Roger knows the right way to do things and that takes time. Because the cabinets were to be done in oil enamel, we also had to allow plenty of drying time once they were painted before the shelves, doors and drawers could be re-installed.

Here's what the cabinets looked like when we started. The new counter top had just been installed and Roger had taken the first two sets of doors to the workshop.

Sink side cabinets before
Washer/dryer side cabinets before


Getting Started

The first step was to replace the Formica counter top with quartz, and we were lucky to find a remnant of Cambria "Clyde" which worked well with the limestone floor, the only fixed element in the room that I had to consider. The counter top was the only thing we changed. Everything else was updated with paint.

As Roger removed the cabinet doors and drawers he labeled where they came from to save time putting them back correctly. He also removed the shelving units in the closets and took down the light fixture, drapery hardware, etc. Once the room was cleared it was time for cosmetic repairs. After covering up, taping and masking off, Roger fixed some bad drywall tape and nail pops in the ceiling and filled the holes in the walls as I didn't necessarily want to put the accessories back in their former places.

The Painting Phase

Then it was on to painting. The ceiling and walls went quickly. As you might expect, the cabinets took a lot more work. Each shelf and cabinet door had to be primed because we were putting paint over laminate and then painted two more times on both sides, plus they had to dry properly between coats. After it was all done there was more waiting.

Here's what we used (all paint by Benjamin Moore):

Ceiling:  Shaker Beige HC-45 - Ceiling Paint
Walls and Closet Interiors: Shaker Beige HC-45 - Aura Interior Matte
Cabinets: Rushing River #1574 - Satin Impervo oil enamel

Some Details

I wanted to coordinate the folding table to the left of the dryer, so Roger painted the legs in Rushing River. He also primed and painted the cabinet shelf supports in Rushing River to give the interiors a finished look. We recycled the old chrome and ceramic cabinet knobs and the black light fixture by spraying them in an oil rubbed bronze. Roger painted the metal dryer vent in Shaker Beige to camouflage it. Paying attention to these details really helped.

The (Almost) Finished Product

It seemed to take forever, but we're finally back in the laundry room, operating as usual and really enjoying it. The beautiful look of Satin Impervo, a better color, not to mention Roger's expert craftsmanship, transformed those glaring white cabinets. Even though the Shaker style remains, in the new color they now look more as if they belong with the rest of the house.

Roger isn't quite done yet. He still has to refinish three sets of double doors: one set of entry doors and two sets for the closets. Then it's on to our next project.

The white plastic shelf supports 
have disappeared.

Cabinets after on the sink side.
Cabinets after on the washer/dryer side.
Dryer vent painted the wall color.

If your cabinets look tired and you're ready to give them a new lease on life, call me at 828-692-4355 to schedule an estimate with Roger. I highly recommend him!


Friday, March 1, 2019

How to Hire a Pressure-washing Service

Residential and Commercial Pressure-washing
by Sterling Property Services
Many people have learned the hard way about the pitfalls of amateur pressure-washing. If you plan to hire a professional and want the best result, how can you find the right company for the job? Here are some suggestions.

Step One:  Identify Prospects.


  • Ask friends, family and neighbors for recommendations. 
  • Use Google to search for pressure-washing companies, then look at their reviews on Google Maps and visit their web site, if any. 
  • Check Angie's List, Yelp and Houzz. 

Step Two: Telephone Interview 


Describe the work you want done. Describe any access problems or other special issues, such as building height over two stories, a steep slope, or the need to provide the water to do the job, as this will automatically eliminate certain bidders.    

Ask questions to learn about the business. Here are some possibilities, ranging from basic to technical. Choose the ones that work for you.
  • How long have you been in business? Experience counts.
  • Do you have a web site when I can learn more about your company? Having a web site is a sign of openness, accountability and a business-like approach.
  • What type of equipment do you use? Professional equipment can supply a force of 3-4,000 PSI (pounds per square inch). It will have an engine with 11-15 horsepower and water flow of 3-6 GPM (gallons per minute). These figures are sometimes combined into CU's (cleaning units), which is PSI x GPM. Professional equipment has a rating of at least 12,000 CU's. Listen for a clear, knowledgeable response. 
  • What pressure do you use? The answer should be the lowest pressure that will get the job done without causing damage, no more than 1,000 PSI.
  • What chemicals or cleaners do you use? Are they biodegradable and environmentally safe? Could they harm the siding, pets, plants, etc.?  If the answer is “bleach”, beware. Professionals don’t use bleach alone because it isn’t an effective cleaner and can cause injury or damage. They also will work in sections so the cleaner isn’t on the house too long. Listen for product knowledge and awareness of the potential for damage. 
  • Do you carry liability and workers’ compensation insurance ?  If yes, get the name of their insurance agent and confirm the details if you hire them. If an uninsured worker is injured at your house, you could be liable. Sole proprietors with no employees are not required to carry this coverage.
  • Who will be on the job doing the work? What training and experience do they have? This is important. It’s usually best not to hire trainees or temporary workers like students. 
  •  Will you provide a written estimate with a detailed description of the work?  Not all contractors, even some experienced ones, can provide written estimates, but it’s preferable.
  • Can you provide references?  If you have any concerns, call and verify them. Look for reviews on Google Maps, Houzz, Yelp, etc.
If the answers to these questions are satisfactory, make an appointment for an estimate.

Step Three: Get the Estimates


More questions and things to consider:

  • Is the estimator on time for the appointment? Is he business-like and well groomed? Is his vehicle clean and professional with signs? His approach and how careful he is with his own appearance and vehicle will tell you a lot about how he operates. 
  • Walk through the project and describe the work you want done in detail, with any special instructions, such as access issues, areas that need care like a trellis with a delicate plant or fragile ornaments 
  • How will you protect my plants? Covering them with plastic or a drop for more than a few minutes could damage or kill them. We rinse plants before, during and after washing.
  • Does the basic estimate include the exterior of the gutters, the downspouts and foundation?   
  • Can you include an option for inspecting, cleaning and flushing the interior of the gutters and downspouts by hand? 
  • Can you wash my roof? Many companies, including ours, will not wash certain roofs for safety reasons and because of the potential for causing damage.
  • Does your estimate including washing my windows?  Basic pressure-washing does not include more than rinsing windows.
  • Who will remove and replace large container plants and furniture?  What do you want me to do before you arrive?  If you’ll need help, be sure to say so.
  • Are there any special procedures or cautions for cleaning your type of siding? For example, older cedar shakes can easily be damaged by too much pressure and using the wrong tip.  
  • Discuss everything you’re concerned about and agree on what steps the contractor will take to avoid problems.
  • What are the realistic results to expect from washing my house? (See below.)  

Step Four: Evaluate the Estimates


Each estimate should contain:
  • The complete scope of work, including the areas to be washed, the preparation that will be done, the products to be used and the clean-up and replacement of furniture and other items that will be done after washing, if included. 
  • Total cost for labor, equipment and supplies, and when payment is due. 
  • How long the estimate is valid.

Once you have all the estimates, confirm that each bidder is using an identical scope of work. Then you can evaluate and rank them. Compare prices, but be aware that an unusually low bid likely represents the least professional result. Check references.

Sterling Property Services
pressure-washing a house in Flat Rock
Washing Day

Now that you’ve found the right person for the job, you can relax. Wrong! There are a few things left for you to do.
  • Arrange to be there when the work is done. 
  • Plan ahead for the best result by removing all small and/or delicate items from the work areas. 
  • Park your car (s) in the garage or down the street. 
  • Make certain all doors and windows are closed. 
  • Bring your animals inside or keep them well out of the way. Even with modern equipment, pressure-washing is noisy, and that can be very distressing to some pets. 

Monitor the work as it progresses to be certain you're happy with the results, but don’t get in the way! 

Realistic Expectations

It’s good to have realistic expectations about the results of pressure-washing and to be aware of some of the things that can occur, even when the work is done properly.
  • Pressure-washing may dislodge loose paint or caulking, but if the paint or caulking is sound, it won’t. 
  • Sometimes spots might remain on the siding after it’s washed. They could be bug droppings that have baked into the surface, a common fungus known as artillery or shot gun fungus, or granules from the asphalt shingles that ran off the roof and caused permanent stains. Don't expect washing to remove them. 
  • Windows might have water spots, but no more than there would be there after a rainstorm. 
  • Black streaks might remain under the eaves or on some aluminum gutters. They are permanent stains caused by constant moisture or rainwater. 
  • Pressure-washing isn’t a substitute for repainting. After your home is cleaned, you may decide that it’s time to get painting estimates.