Friday, August 24, 2012

Go With the (Color) Flow

"Flow" is one of those design buzzwords you often hear, but the term is so nebulous it's not well understood, and its importance is often overlooked. The idea behind it is simple: flow is continuity. When it comes to interior colors, achieving flow can be a challenge because: 

  • Most people choose interior colors one at a time as they paint a particular room, often without considering how the new color(s) work with their existing choices. 
  • Colors also are chosen without making sure they work with permanent features, such as flooring, counter tops, tile, stone, etc. 

These two factors work against creating color flow, which is a component of the overall design goals of unity and harmony. Always keep in mind that your house shouldn't look like a collection of unrelated or conflicting ideas, it should look as if all the rooms belong under the same roof.  
When it comes to color, there's a very simple way to create flow, and that's through repetition, which creates a connection between spaces and makes them come together as part of a harmonious whole. 


Easy Ways to Create Color Flow


  • Paint the trim in a single color throughout the house.  It does not have to be stark white!

  • Pick a team: choose a color plan for the walls based on either tints (a hue plus white) or shades (a hue plus black or an earth tone). See my earlier post on this topic for more information: Mixing Tints and Shades-Proceed with Caution .

  • Select three to five of your favorite colors to be your "Core Colors". Be certain that they harmonize with all the permanent elements in your house. Use each color more than once. For example, if you love red, use it for the dining room walls and in the powder room or den, or on the back wall of built-in bookcases, or on a wall at the end of a long hallway. Find red accessories and use them throughout the house, especially in those rooms where you haven't used any red paint. Follow this approach with your other "Core Colors"

  • Use Expanded Core Colors. To have more color options, go to the paint store and find the strip for each of your core colors. Use lighter and darker versions of each color. A light version of the red in your dining room might be the perfect pink for a girl's bedroom. A darker version of that color might be perfect for the den.

  • If you're stuck for color inspiration, don't re-invent the wheel. The major paint companies have done all the work of finding pleasing color combinations. Look at their brochures and visit their web sites.  Benjamin Moore also has created a brochure on color flow with several excellent examples:  Color Flow . 

  • Paint all the ceilings in the house in the same color. (Your ceilings not only don't have to be stark white, the color should be chosen to harmonize with, or be one of, your Core or Expanded Core Colors. With color on the walls, stark white ceilings look "wrong", or as if you forgot to paint them. Repetition of both ceiling and trim colors throughout makes it easier to paint the walls in each room a different color, if that's your inclination, without sacrificing color flow.

  • Transition or connecting spaces such as hallways, foyers and stairwells need a color that works with all the rooms that adjoin them. Notice the rich red in the Benjamin Moore Bold Color Flow diagram, and the neutral in the Soft Color Flow diagram. As you see, either approach can work.


  • Pay special attention to contrast and harmony in an open concept plan. If you can see colors in adjoining spaces, make sure they're on good speaking terms. Extreme contrast can stop the eye and disrupt flow, which is fine if drama is your style, just be sure you want to live with it. One way to know exactly how much contrast there is in your Core Colors is to note their LRV or Light Reflectance Values and work with colors that have similar LRV numbers. To read more on this subject: Light Reflectance Values.  

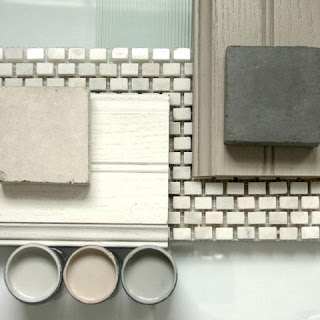
  • Create a simple diagram of your house and test color relationships. Cut samples from paint strips and place on your diagram in the room where you might use it. This example and the ones from the Benjamin Moore brochure show at a glance how the colors work together. Notice the use of repetition in the example below.


Color flow is more than a buzzword. It's an essential part of creating an attractive color plan for your home.


Tuesday, August 14, 2012

Low Cost Solutions for Skimpy Crown Molding and Baseboards

Typical Skimpy Crown Molding
It used to be that even modest homes featured well-proportioned, somewhat elaborate trim, including baseboards, crown moldings, wainscoting, chair rails, mantles, picture rails and more. However, beginning in the post-World War Two era, these details fell out of favor in the rush to create affordable housing. The sad result is that today many if not most homes lack all but the most basic trim, and rooms often feel like a series of bare boxes, with narrow baseboards and skimpy crown molding, if there's any crown molding at all. Builders who do install trim seem to do it without thought as to whether or not it's the right design for the architecture and correctly proportioned for the height of the ceiling and the size of the room.

When trim is too small, a room feels "wrong". When it's too large (which I've never seen), the room can feel cramped. Even in smaller rooms with eight foot ceilings, the standard 3.5" builder grade baseboard looks undersized. I think baseboards for these rooms should start at five inches and the crown should be a similar size for balance. In larger rooms with taller ceilings, wider base and crown are needed. To determine what's right for your house, buy sample pieces of trim or make cardboard strips of varying widths and see what you prefer. 

But what if you're not building or remodeling and your budget doesn't allow for installing the crown molding and baseboards of your dreams? Let's look at some low cost solutions:

Low Cost Solutions for Skimpy Crown Moldings and Baseboards

Crown Enhanced with a Small Piece of Trim
  • Add a small, inexpensive piece of trim below the crown molding (or above the baseboard) to make it look larger. Paint the crown or base, the space in between and the new trim in the trim paint to create the illusion of a much larger molding. This picture is from a blogger who did it herself, and you can too...


Crown Enhanced With Paint
  • Create the illusion of larger trim with paint. Extend the depth of the trim by defining a new outer edge with masking tape, and paint the new area with the trim. Be sure to use low-tack masking tape designed to create crisp edges. 
  • Use a stencil or wallpaper border in a design that mimics classic trim, (not ones with flowers or circus animals). I almost didn't mention this option because stencils and borders are currently out of favor in most areas, so make sure anything you do is easy to remove when it's time to sell...

The Easiest Solution of All:

Don't accent skimpy baseboards or crown. Paint them in the wall color. There's no rule that you have to accent trim because it's there, and it's especially unwise to call attention to undersized trim by painting it white, or some other color in high contrast with the wall color. When you treat trim as texture by painting it in the wall color, it has the added benefit of raising the perceived ceiling height and making the room look larger.


When You Have No Crown Molding and a Tiny Budget

If you have no crown molding and want to create the illusion that you do, use masking tape and paint. Start the crown illusion on the ceiling by creating a line at least two inches in from where the ceiling meets the wall, and make the section on the wall at least five inches deep, even in small rooms with low ceilings. Test the proportions on one wall using masking tape, before you commit to the design.


Tuesday, August 7, 2012

Smart Home Selling In Landrum, SC


I wish more sellers were as smart, open-minded and hard-working as Jim and Lisa Murphy. Here's the story of how Roger and I collaborated with them to transform their rental property into a warm and inviting home, ready for a new family to move in.


A Charming House in Landrum is Prepared for Sale


Here's what they had to say when the project was finished and the house listed:

"We found both Sandy and Roger to be extremely knowledgable in their respective areas of expertise.  Sandy's eye for color and advice was 'spot on', made a lot of sense and looked great on the walls when Roger finished his wonderful work.

We had both taken the 'Smart Selling' course and found it extremely helpful.  Working with Sandy and Roger then helped to make the transformation possible.  Some of Sandy's staging ideas cost very little, and in general, her advice helped us to maximize the effect of the money we did have to spend.

After a lot of hard work on everybody's part, we feel we have an awesome (and very marketable) house that we hope will appeal to many potential buyers.  It's better than new and in 'move-in' condition!"

Jim and Lisa


Friday, August 3, 2012

How Wet Should Your Deck Be?


This summer has been a frustrating time, with daily afternoon storms that make it impossible to schedule deck refinishing projects. The wet weather got me thinking about all the things that can happen to decks, and what it takes to care for them properly.

Do you know the most common reasons that many deck finishes fail prematurely? Improper workmanship and exposure to the elements are the chief culprits. Since you can't control the weather, if you hire someone to refinish your deck, make sure they know how to do the work the way it should be done. This means, among other things: 
  • correct and thorough preparation.
  • use of the appropriate material, based on the existing finish.
  • application of the new finish when the wood is sufficiently dry to accept it, and when weather conditions are right, including the temperature and the prospects for rain. If the sun shines directly on the deck all day, the weather needs to be relatively cool while the material is being applied, or the finish might not look uniform. There should be no rain in the forecast for at least 24 hours, preferably longer.
When you’re getting estimates, there’s a simple way to test the contractor's deck expertise: ask what the moisture content in the wood should be when the finish is applied, and how he plans to determine when your deck meets that criterion. Discuss how the weather will affect his plans for doing the work, and what type of finish he recommends, and why. Do your homework first by asking one of the experts at your local paint store for his product suggestions so that you can discuss the options with the contractor.

 Ideally, the contractor will test the moisture content in the wood with a moisture meter. That's what Roger always does. The water content should be less than 15%. Every manufacturer’s label will specify how the material is to be applied, and under what weather conditions. The contractor should be familiar with the requirements of the product he recommends.

Even when you apply premium grade materials and the work is done correctly under perfect conditions, you must accept the hard fact that decks are a routine maintenance item. The conditions at your house, including the age of the deck and how well it was built, the exposure, the wear and tear it receives, the type of finish you choose and how diligently you maintain it, also will affect how often the deck will need to be refinished.

If your deck needs a fresh start, call me to schedule an estimate. Roger has been a “deck doctor” for many years, and can give your deck a new lease on life. All he needs is good weather."

You can reach me at 828-692-4355.

Friday, July 27, 2012

Go Ahead: Make Paint Color Mistakes

Many people are so afraid of making a mistake choosing paint colors that they go into paralysis and avoid painting, or play it so safe that they wind up with a bland and boring color that doesn't really please them. What a shame.

There's nothing wrong with making a color mistake. In fact, seeing what doesn't work, for whatever reason, is the best way to train your eye and learn what does work, and what you like to live with. Paint is the all time champion of decorating bargains, so it's a very inexpensive lesson, especially when compared with the cost of a couch. If you paint a room blue, only to realize that with a northern exposure, blue walls make the room feel cold, you'll learn from it and apply the lesson to future projects.

To reduce the cost of your experiments, buy the color(s) you're considering in the sample size offered by many paint manufacturers. It's just enough paint to apply two coats on a 2x3 foot piece of foam core so that you can view the color all around the room under varying light conditions. It also avoids the misleading color impression from the common mistake of painting swatches side by side on the walls. 


So don't be reluctant to try new colors. You can make mistakes on a small, inexpensive scale, encourage your creative instincts, learn a lot, have a wonderful time in the process and best of all, wind up with colors you really like.


Thursday, July 19, 2012

Color Matching: Set Yourself Free!

Many clients have told me that they want to find a paint color to match the fabric on their couch or window treatments, or the carpet, the counter tops in the kitchen, the stone in the fireplace, etc. Some believed that there's an interior design rule that requires matching, and some were uncomfortable with color decisions and afraid of making a mistake. Whatever the reason, I always tell clients not to worry about matching because nothing is special if, for example, the couch, carpet or drapes disappear into the wall color, instead of complementing, and being complemented, by it. 


Colors that match perfectly not only look boring and a bit contrived, except perhaps in the most high style designs, they can be difficult to achieve because of differences in the items themselves, such as the texture or sheen of fabric vs. paint, and the different types of colorants that are used to create them. On the other hand, a color plan with differences, whether subtle or dramatic, looks far more lively and interesting.  To learn more, follow this link:  Why You Need A Paint Color Plan


If you've been concerned about color matching, it's time to set yourself free. Good design not only doesn't require matching, it usually avoids it, preferring a coordinated whole, with enough diversity to create interest. 


Make friends with a basic color wheel, like the one on the left. If you want to showcase a beautiful fabric, consider a complementary color (opposite on the wheel) for the walls. In the picture above, someone is trying to find the perfect blue, but to showcase the fabric, they should also consider complementary colors or neutrals. It all depends on the look they want...


When you have color decisions to make and would like a little help, call me at 828-692-4355 to schedule a  consultation (two hours/$150).  

Tuesday, July 17, 2012

Installed vs Evolved Design


An Installed Landscape
When I first started using these terms, I was thinking of our imperfect, evolving garden vs. one that's professionally designed and installed. Most of the time you can tell the difference at a glance, like this formal garden that was professionally designed, installed (and maintained). Our evolving garden reflects our amateur mistakes, changing enthusiasms and the limitations of time and budget. It's far from the perfection of an installed garden, but it's a reflection of us, and we enjoy the process (most of the time), and the result. 


Installed Design - Benefits and Limitations


In the best installed designs, things are done correctly from the beginning. There's a well conceived plan tailored to the house that accomplishes all that a good plan requires. On the downside, installed designs are only as good as the designer. If they're filled with predictable ideas, they look like they were taken from a manual. If the owner has little or no involvement, it's likely the result won't feel personal.


The concept of the installed vs. evolved approach also applies to interior design.


Installed Design - Interior


Basic Installed Design
At its most basic, installed design is what you see in a motel or in a vignette in a furniture store, with a set of matching pieces, few, if any, accessories and no personality. The artificial look of an installed design can also result from relying too heavily on suites of furniture, or on the use of the companion fabrics manufacturers have created to reduce the angst many people feel trying to create pleasing combinations. 


The highest form of installed design is a turnkey landscape or interior project with a medium to large budget. There will be considerable attention to detail, but elements are chosen, at least initially, by the design professional, and may or may not be approved by the owner. The design has personality, but the result may not be truly personal to the owner. 
Luxury Installed Design


Evolved Design - Interior


Evolved design is what most of us have. Our furniture and accessories reflect our lives. In our house, the china cabinet was inherited from my grandmother Mills, the copper tea kettle from Uncle Bob and Aunt Joanne, a bookcase came from my mother. Along with the pieces we bought over the years, some things were acquired on our travels, while others were found at an antique shop or salvage yard, and refurbished.  We even made a few things ourselves. As we lived in different places, things moved around. A bookcase went from the home office to the sewing room, a lamp that was in the living room in our last house went to live in the guest room when we moved here. Sometimes the treasure that worked beautifully in one house would find itself homeless in the next, and we had to store it or rethink how to make it work. Some things that didn't have a proper home before, came out of storage to be enjoyed again. Nothing stays the same around here. 

While I appreciate the beautiful installed designs I see in magazines or on-line, and find lots of inspiration, I prefer that our home incorporate both formal and informal bits and always evolve. Not only is it one of a kind, it's more fun, personal, comfortable and relaxed. 

Wednesday, July 11, 2012

Playing the Color Percentages


I don't know who it was or when it happened, but years ago somebody came up with formulas for working successfully with interior colors.  Now widely used, the formulas vary according to the number of colors in the room. 

A 90/10% Blue and Yellow Plan

Percentages for Two Color Plans  

Major Color                    Minor Color
    90%                                      10%
    80%                                      20%
    70%                                      30%
    60%                                      40%


How To Make a Two Color Plan Work

If your plan is based on close percentages like 60/40%, there should be relatively little contrast in the minor color to avoid conflict or a jarring impression. With high percentages such as the 90/10% example in this picture, you can use stronger contrast in the minor color to add a spark.


Percentages for Three Color Plans

 Major Color                     Minor Color                    Accent Color
        80%                                    15%                                       5%
        70%                                    25%                                       5%
        70%                                    20%                                    10%
        60%                                    30%                                    10%   


How to Make a Three Color Plan Work

With a three color plan, two of the colors must work together to create harmony in one of the following ways:
  • same coolness or warmth
  • same intensity (brightness or dullness)
  • same value (lightness or darkness)
  • by strongly sharing a common ingredient (neighbors on the color wheel, such as red and orange)


The Only Percentage to Avoid

Avoid a 50/50 color plan which creates tension because there's no winner. For any color plan to work, one color must dominate.


The Rule of (at least) Three

When you pick a color, try to use it at least three times in the room. For example, if you have a sofa fabric with multiple colors, pick one to use in a cushion fabric, in a ceramic piece, and in another item, such as art or in the drapery fabric. It is this repetition of color that creates rhythm and harmony in your color plan.

The Rule of Three in a Olive, Brown and Beige Plan

Color Percentages - The Bottom Line

While the concept of color percentages is helpful, it can be difficult to calculate them in the real world, especially since many of us use prints with multiple colors. I say, don't bother! I consider some so-called "design rules" a starting point only. Instead of worrying too much about achieving perfect color percentages in your designs, choose a color to be dominant, one to be secondary and, if you have a three+ color plan, a couple (or more) to play supporting roles. 


Friday, July 6, 2012

Should You Paint It Yourself?

The advertising by major paint companies encourages homeowners to consider painting a do-it yourself project, and when the work is straightforward, such as painting walls, it can be. However, there are many circumstances when the best approach is to call a professional.


Here are some things to consider when you're deciding if you want to do it yourself:

  • Purpose of the work and the size of the budget.  Budget can trump every other consideration...
  • Size and scope of the project. Is it manageable? How long can you take to complete the work without causing problems or serious inconvenience?
  • Time frame. Are you certain that you have enough time to do it yourself? If you don't paint for a living, you won't have a realistic idea of how long things take, and 99% of the time, you'll underestimate. Allow extra time.
  • Interior work. It takes far more skill to paint inside a furnished home than is required for most exterior projects. Do you know how to work cleanly and protect the adjacent areas? Do you know the best way to handle details such as hardware and light fixtures? 
  • Access difficulties. Are there tall ceilings or a stairwell that would be difficult to access? Do you have the right equipment and are you comfortable working high? 
  • Complex trim. Is there detailed crown molding, cabinetry or a fireplace that requires skilled brushwork?

  • Type of Material(s) to Use. Do you know the right type of materials to use for each surface, including how compatible each would be with the existing finish? Do you know when you need to prime? 
  • Ease of Application. What material does the project call for? Some materials, such as oil base enamel and clear finishes, can be challenging to use.
  • Cosmetic repairs. Preparation determines the quality of the result, especially when there are holes in the walls, cracks, stains, or other problems. Bad repairs make problems look worse. 
  • Equipment, tools and supplies. Do you have ladders, drops, buckets, rollers, screens, poles, a variety of small tools, sandpaper, plastic, various types of masking tape, masking paper, materials for patching and caulking, a masking machine, caulking gun, etc? This is just the beginning of a long list of things that professional painters have on hand.
  •  Your skill level. If you've never painted and don't know where to begin, this may not be the project for you.
  • Quality of the result you want. Is just OK good enough? 
  • Other issues.Do you hate to paint? Are you klutzy? Do you and your spouse work well together? 
Your answers to these questions should point you in the right direction. If you decide that you want professional help, call me at 828-692-4355 to discuss your project and schedule an estimate with Roger. When you hire us to do your painting, a color consultation with me is a free part of our service.

Thursday, June 21, 2012

Why You Need A Paint Color Plan

Whether I was there as a color consultant, painting contractor or professional stager, over the years I've been in thousands of homes of every size, style and price range. 
One of the most common mistakes I encounter in homes of all types, is a piecemeal approach to choosing interior colors. Although I'm a big fan of evolving design that showcases your personal style vs. the installed by a decorator look, color is a design element that needs to be coordinated throughout the house for the best result. 


Why You Need a Color Plan
Without an overall color plan, a house lacks harmony and unity. Conflicting or unrelated colors are not only unattractive, they can be uncomfortable to live with because they're disconcerting. Consider this example I saw recently: the daughter's room had bright pink walls, the son's room was black, the kitchen was a sunny yellow and the rest of the house was beige. The result was color chaos! When you're selling, badly chosen (or badly coordinated) colors can decrease its value and marketability. 


Even if you paint your house a little at a time, it's wise to develop an overall plan. If you've already done a lot of painting, analyze what's working and what isn't, create a plan, then make adjustments as your time and budget allow. 


Here are some simple "do's" and "don't's" for creating your color plan: 


DON'T cop out completely by painting everything white. That's an opportunity lost and a poor choice for many homes.


DO start with the colors in the permanent elements (floors, carpets, counter tops, stonework, tile, etc.).


DO use several colors for variety and interest.


DO consider using lighter and darker versions of the same colors.


DON'T use both tint colors and shade colors on the walls. They're different concepts, so pick a team and play on it.   Tints and Shades


DO learn about light reflectance values (LRV) so you can compare colors accurately. Here's a short explanation from our web site:  Light Reflectance Values (LRV)


DO repeat colors to create unity and harmony. For instance, the living room color might also work well in a powder room. 


DO use a single color on the trim to tie the plan together.


DON'T accent baseboards or crown molding smaller than four inches wide, especially in homes with eight foot ceilings. Instead, paint them in the wall color so that instead of drawing attention, they become texture and improve the proportions of the room.


DO consider painting bathroom vanities in accent colors. This is a very cost-effective way to add personality. 


DO consider a special color for some ceilings, such as the dining room.


DON'T automatically paint ceilings white, especially when you've chosen earth tones for the walls. They'll look out of place with the wall color, or as if you forgot to paint them.


DO consider painting the back walls of shelves in accent colors.


DO use color to tweak the architecture. Use an accent color on the end wall of a long hallway to minimize the "bowling alley" impression. 


DO consider using darker, richer colors in some areas, such as a media room.


DO use blocks of color to help define areas in large, open spaces.


DO consider the room's sun exposure when you're choosing colors. If the room faces north, warm colors are a good idea to counteract a cold, gray feeling.


DON'T make color decisions from a tiny paint chip or color strip. They don't tell you what a color really is like. Instead, create 2x3 foot sample boards using inexpensive foam core, and look at the samples under different light conditions.


DO view the samples in the orientation the color will be applied. If you're choosing a ceiling color, tape the sample to the ceiling.


DO create your own design book with samples of paint, fabric, tile, etc. Carry it in the car so you never have to guess if something will work with what you have. Our ability to remember color accurately is faulty.


Have fun with color when you're creating your space, but take the time to do a little planning before you paint. If you need help, call me at (828) 692-4355 to schedule a color consultation. 


Tuesday, June 5, 2012

Smarter Painting Estimates

As professional painting contractors who know what it takes to do our work properly, Roger and I often find it frustrating that many people think all painters are created equal, and can't see beyond finding the lowest bid. We understand that getting good value for your investment is important, and it is to us too, but we want you to know that a low bid may wind up being a bad bargain.

Many states, including North and South Carolina, have no licensing requirements, or proficiency standards. As a result, there will be significant differences in knowledge, skills and professional work practices among those who bid your project. Today people seeking work as painters often include students who need a summer job, and others who are painting because they can't find employment in their regular occupation. Most have no training and don't particularly like to paint, so what kind of work can you expect from them, especially when they've given you a low bid? Not only that, it's highly likely that each person who gives you an estimate will see the work differently, or not understand it, and you'll wind up trying to compare proposals, not knowing which approach makes the most sense.

We'd like you to consider a new way to get painting estimates. It involves more work, but it will help ensure that the job that gets done is the right one, and it will give you an objective way to compare estimates.
  • Take pictures of what you want to have painted and print them with your color printer (plain paper is fine).
  • Bring the pictures to the expert at your local paint store and discuss your project, including details about the condition of your house, and any plans you have for color changes.
  • Ask for guidance on:
    • preparation needed
    • number of coats to be applied
    • best method of application
    • recommended materials for the job.
  • If feasible, plan to buy your own materials and major supplies and get an estimate of quantity and cost. 
  • Get contractor recommendations from people you trust, and schedule appointments to do an estimate. Keep in mind that painting the interior of an occupied home requires much greater skill and care than exterior painting.
  • At the time of the estimate, pay attention to how the contractor presents himself, and look at his vehicle. You'll learn a great deal about his work habits...
  • Pay attention to how carefully the contractor inspects the job. Is he thorough? Does he take notes, measure, examine the condition of the surfaces, take pictures or sketch, ask questions?
  • Give your scope of work to each bidder, along with a form on which to submit their bid. 
  • The form should include a payment schedule, plus insurance, clean-up and any other requirements you have.  It also should include the stipulation that by submitting a bid they agree to complete the scope of work to your satisfaction, and comply with the other requirements.
  • If the contractor will have employees on the job, require evidence that he carries workers' compensation insurance, and that coverage is in effect.
  • Tell each bidder to bid the basic job per the scope of work, and to price any options or recommendations separately.
  • Instruct them to include only equipment charges (such as for pressure-washing), incidental supplies and labor in their basic estimate.
Now you have a sensible way to compare the estimates, and you have control over payment.

Even if it's not feasible for you to follow all the steps that I've outlined, particularly for smaller jobs, at least take the time to develop a better idea of what you want to accomplish. If you can discuss the work knowledgeably and in detail, bidders can prepare estimates on the same basis. This step alone can help you avoid some of the common pitfalls when comparing painting estimates, so that you're likely to have fewer problems and results that meet your expectations.

Beware of an unusually low bid because it normally means the bidder:
  • didn't understand the scope of work
  • intended to take shortcuts, usually in the preparation phase
  • uses unskilled or temporary labor and pays them cash
  • plans to use lower grade materials
Painting done well can have a significant, positive effect on the value and enjoyment of your house, far beyond what the work costs, so it's worth hiring the right people and doing things the way they should be done.

If you would like to have your painting done by a professional you can rely on, call me to schedule an estimate at 828-692-4355.  


Friday, June 1, 2012

Choosing A Front Door Color - A Baker's Dozen Mistakes to Avoid


If you're one of the many people who think of your front door as just another piece of trim, instead of a design element that deserves special consideration, think again. If you don't make a wise choice about what color to paint it, you'll not only waste a crucial opportunity to add style and impact, and you might even detract from the potential curb appeal of your house. There's a lot at stake.


Here are some common mistakes to avoid when choosing a color for your front door:

#1-This Garage Door Has Won
  1. Letting the garage door "win".  In many houses, the garage door(s) and front door can be seen at the same time. If you call attention to the much larger garage door(s) by using the trim color, you've made it/them dominant and exaggerated your design and curb appeal problems. Think of it this way: Which is more important - the front door, which is the natural focal point and where you welcome people, or the garage door(s) where the cars live? The way to give your front door prominence and de-emphasize the garage is to paint the garage doors(s) in the wall color (assuming it can be done without voiding the warranty), causing them to recede into the background. Make your front door stand out by painting it a special color that appears nowhere else.
  2. Painting the front door in your favorite color, whether or not that's a good idea. I've seen a few bright pink front doors, and none did the house any favors.
  3. Using a color just because you liked it on someone else's house. What may be right for their house isn't necessarily right for yours. 
  4. Failing to consider your location. Colors that are attractive at the beach, probably won't work as well in the city or in the mountains. 
  5. Ignoring the architecture of your house. Many colors that suit the front door of a cabin aren't the best choices for a modern house or a Colonial. 
  6. Failing to coordinate all the paint colors with the colors in the permanent elements, such as the roof, stonework or vinyl windows. The permanent elements should be the starting point for creating your color plan. One of the most common problems I see is vinyl windows, especially pure white ones, that weren't considered when the wall and trim colors were chosen, and are so out of place and high contrast that they ruin the look of the house.  
  7. Ignoring the colors in your landscaping, especially the evergreens and flowering plants. Don't choose a bright red front door if your landscaping features pink and purple rhododendrons.
  8. Choosing a front door color that doesn't coordinate well with the wall and trim colors. Your color plan must be unified to be attractive, and if one of the elements doesn't work, the plan fails. See #9 for one example of this problem.
  9. Combining tint colors with shade colors (see my earlier post on  Mixing Tint Colors with Shade Colors). There are tint and shade versions of most hues, so, yes, you can still have a yellow front door. Just be sure you use the right yellow.
  10. Not considering the overall impression you want to create. Do you want elegance, drama, warmth, historic accuracy? The front door color is the one that sends the key message.
  11. Failing to paint the screen door or storm door in the same color as the front door (and choosing a design that conflicts with the front door, or hides its features). You haven't accomplished much if you buy a beautiful front door, paint it an attractive color and then undermine the look with the screen or storm door design and color.
  12. Outlining or accenting parts of the door. Use a single color to avoid a busy, chaotic look. 
  13. Making color decisions from a paint strip or small chip instead of a large sample. You won't know what a color really looks like if you work from a chip or a strip.

    # 11  - Over-accenting


#2-Someone's favorite color.


#7 - Tint and shade combination

Paint Sheen
The sheen of the paint you use is also important. The higher the sheen, the more intense the color becomes and the more every little flaw will show. High gloss paints are best reserved for new doors, or ones that are in perfect condition. If your front door is less than perfect, choose a low sheen enamel. Sheen names vary by manufacturer and product line, so talk with the experts at the paint store about the best choice for your door.

Paint Quality
Quality matters. The front door is the most important design element in the front of your house, so don't skimp. If you use cheap paint and don't take the time to prepare the door correctly by cleaning, patching, caulking, sanding and priming as needed, then applying at least two finish coats, the door won't look its best and it won't enhance the value of your house. Given the cost of many front doors, having it professionally painted it is a wise investment. 

Want a Beautiful Front Door? Call Us!
We're known for very high quality finish work. If you have a front door to paint or stain, including cosmetic repairs, or an entire house to paint for that matter, call me to schedule an estimate. If you choose us to do the work, a color consultation with me is a free part of our service.

You can reach me at 828-692-4355.


Friday, May 25, 2012

Embrace Contrast and Make It Work For You


When I was in decorative painting school learning how to create an authentic-looking faux marble with veining, my instructor often said that contrast was "the enemy". It was a pretty dramatic statement, but in context it made sense. As students, one of our goals was to learn how to make veins and drifts look natural, which meant as if they'd been buried over eons in deep layers, instead of just sitting on top of our sample boards looking like phony bits added with a feather or sea sponge. To help achieve the natural look, the final step in the faux marble process was to add translucent coat(s) of glaze, reducing the contrast between the veins and the drifts, hiding any suggestions of the tool we used to create them, and burying them enough to look real. 


Creating faux marble is an example of when contrast can work against you, but more often contrast is a key way to add the drama and interest that can lift a design of any type out of the realm of ordinary and make it memorable. What do I mean by contrast? There are many types, and if you can understand them and train your eye to identify them at work, including when there's too much or too little contrast in a particular situation, you'll develop the skill to use them successfully in your own projects, whether it's in your home, your garden, or even in your wardrobe.


There's a lot more to the principle of contrast and ways to create it, than you might think. As a starting point, look at this list from Wikipedia's essay on design elements and principles. Note that it relates to many types of design, and that the list is  far from complete! 


Ways to Create Contrast

  • Space:  Filled vs empty, near vs far, 2-D vs 3-D
  • Position:  Top vs bottom, isolated vs grouped, centered vs off center
  • Form: Simple vs complex, beautiful vs ugly, whole vs broken 
  • Direction: Vertical vs horizontal, stability vs movement, convex vs concave 
  • Structure: Organized vs chaotic, serif vs sans serif, mechanical vs hand drawn 
  • Size: Big vs little, long vs short, deep vs shallow 
  • Color: Grayscale vs color, light vs dark, warm vs cool 
  • Texture: Fine vs coarse, smooth vs rough, sharp vs dull 
  • Density: Transparent vs opaque, thick vs thin, liquid vs solid 
  • Gravity: Light vs heavy, stable vs unstable
Did you think of some types of contrast that didn't make the list? What about a patterned fabric vs a solid, a high gloss paint vs matte?  Can you think of other types? 
High Contrast Creates Dramatic Impact


Contrast with Paint
When you're doing a painting project, make conscious choices about how much contrast (drama) you want, and factor in the condition of the surfaces you're painting. Choose low contrast colors and low sheen paint if they're not in good condition, or you'll call attention to their shortcomings. 


Here are some contrast issues to consider:
  • Color Palette - opposites on the color wheel, as shown in this turquoise and orange room, are high contrast and dramatic, neighboring colors are lower contrast and more subtle. Using a single color or color family throughout is a lower contrast, less dramatic choice than multiple colors.
  • LRV Values - There is an accurate way to measure the contrast between two colors. (See my article on Light Reflectance Values and learn about this valuable tool.) This information is essential when you want to control the amount of contrast between colors.
  • Color Temperature and Saturation - warm vs cool colors, bright vs dull colors, tint colors vs shade colors (See my previous post on Tints vs Shades.) 
  • Paint Sheen - the higher the gloss, the more every imperfection will show. 
  • Treatment of Architectural Details - If the proportions of architectural details such as baseboards and crown molding are skimpy or the quality isn't good, paint them in the wall color instead of an accent color so that they become texture instead of a contrasting element that has an unintended negative effect on the appearance and proportions of the room.
Subtle Contrasting Elements 


Monochromatic and neutral color schemes continue to be very popular, and rely heavily on the use of contrasting elements to be warm and inviting. Notice the neutral color palette in this bedroom, and how several types of subtle contrast in the paint, fabrics and accessories create warmth and interest. There's a mix of organic and inorganic elements, sheer fabrics and heavy ones, large scale objects and smaller ones, contrasting colors on the walls, ceiling and trim, etc. The lesson in this room is that contrast doesn't have to be bold to be effective. 


Unless you're creating a faux marble, contrast isn't the enemy, it's your friend. Learn to embrace it and make contrast work for you.

Tuesday, April 17, 2012

Don't Forget to Floss - Your Deck, That Is...

There's no getting around the fact that decks require a lot of maintenance if you want them to last and look their best. The good news is that if you're diligent, you can extend the life of your deck by years.

In addition to keeping the deck clean and refinishing it when needed for protection from the elements and cosmetic enhancement, plan to regularly floss between the boards so that debris doesn't accumulate. This step is important because the debris will trap moisture,which leads to rot.


If you don't want to get down on your hands and knees to do the work, the Fiskars Deck Flossing Tool is a great solution, but it's pricey.


5 in 1 Tool
As an alternative to the Fiskars or similar long handled flossers, you can use one of my all time favorite tools, the Painter's 5 in 1, but you're going to have to bend over or kneel to get between the boards, and on a large deck this would be no fun. The 5 in 1 costs about $8 and does so many things that if you don't have one, do yourself a favor and get one. I do everything with my 5 in 1, except spread mustard on Roger's sandwiches.

No matter which tool works better for you, it's important to get your deck clean and looking its best, then keep an eye on it to be sure it stays that way.

If you need help, call me to make an appointment with Roger to do an estimate. He's been restoring decks of all types for many years, and has brought quite a few back from the brink of death!     
828-692-4355